How to Draw a Mercedes-Benz G-Class
In this lesson you will learn how to draw a Mercedes-Benz G-Class, one of the longest-living icons of the German car industry.
For more than thirty years, this model has evolved from a military vehicle into a civilian version while keeping its distinctive boxy silhouette.
Over time, the G-Class has also become associated with representatives and very influential people, and in some countries even carried a reputation tied to its use in less formal circles.
In this step-by-step guide, we will show you how to draw the unique shape and details that make the Gelandewagen really luxurious and legendary.
How to Draw a Mercedes-Benz G-Class: Step-by-Step Tutorial
Step 1 – Sketch the boxy silhouette of the G-Class
Gelendvagen has changed little since the ’70s, from that era when angular cars were fashionable. In the first step, we will just mark the body of this brutal SUV with very light and loose lines. Mark the rectangular proportions, where front should look nearly vertical, and the rear is squared off no slope.

Step 2 – Sketch the SUV’s wheels and angular windows
Despite its squareness, the wheels of the G-Class are still round. So now, using very light lines, draw two large circles for the wheels of the Mercedes-Benz Gelandewagen. Above, sketch the window line as straight rectangles, making the surfaces flat.

Step 3 – Sketch the angular doors and mirror
As already mentioned, the lines of the Gelandewagen are very straight, including the doors. Sketch these straight doors with sharp vertical and horizontal strokes, giving them a flat rectangular look. Next, draw the boxed rear-view mirror of your Gelandewagen. Finally, lightly sketch the spare wheel mounted on the back door – a key G-Class feature.

Step 4 – Sketch the straight-lined wheel arches and bumpers
Cars usually have round arches, but the G-Wagon sticks to its own style, so even the arches are made up of straight and angular lines. First, refine the arches as squared shapes with angled edges. Add the front and rear bumpers with blocky shapes that extend slightly beyond the body. Inside the wheel outlines, lightly sketch circles for the rims, leaving room for more details later.

Step 5 – Draw out the front of your Mercedes-Benz G-Class
It is time to start tracing and darkening the details that will be performed with bold lines. First, trace the side edge of the front grille. Then, reinforce the hood lines so it looks flat and strong, darken the bumper, showing its boxy construction. Also, add the air intake, molding, and turn signal on the side of the hood. Next, detail the angular wheel arch above the front wheel.

Step 6 – Refine the squared Mercedes G-Class greenhouse
It seems to us that when designing the G-Class, the designers did not think about aerodynamics at all. So here we will trace the angular cabin of the Geländewagen (which by the way translates from German as “SUV”) with dark lines. Darken the side window frames, add the pillars separating the glass sections, and detail the boxed side mirror.

Step 7 – Detail the angular windows, doors, and moldings
Now, draw out the straight lines of the doors and draw out the moldings on the side of your Mercedes-Benz G-Class. Just below, trace the side skirt and a double exhaust pipe, located in an unusual place. Also, draw the door handles, that have very simple and retro look.

Step 8 – Draw the rims of your Mercedes G-Class
Trace the round tires (compasses can be used, by the way) and detail the pattern of the rims. Add the same multi-spoke rims as in the example, or AMG rims as in our Mercedes-Benz S Coupe drawing tutorial. Inside each wheel, carefully add symmetrical spokes radiating from the very center. Also, darken the outer tire edges and erase the guidelines from your sketch.

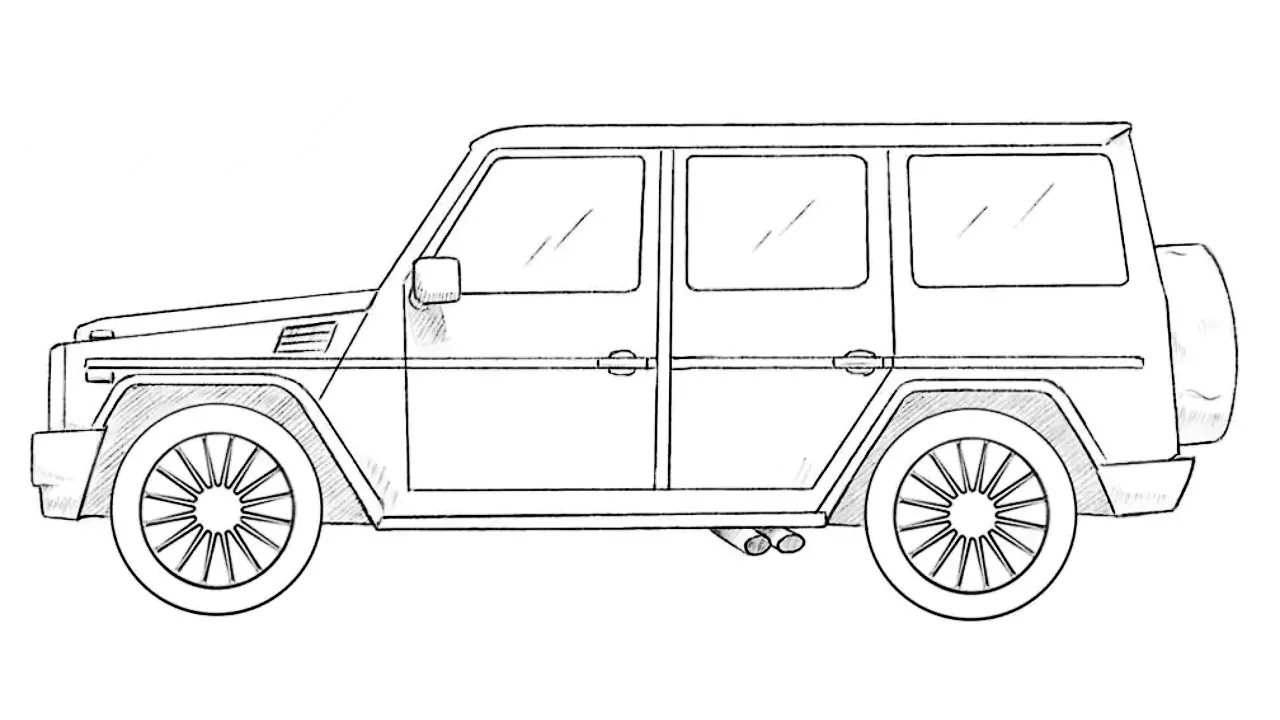
Step 9 – Shade the G-Wagen and add glossy reflections
Using shadows and highlights you can make your Mercedes-Benz Gelandewagen drawing look more voluminous and realistic. Add simple hatching inside the squared arches and to the unlit planes. Also, use diagonal hatching on the windows, to create glossy glass reflections.

Mercedes-Benz Gelandewagen design features
This car is a real icon and especially loved in Eastern Europe. G-Wagen is driven by both military and gangsters.
Many people believe that a real G-Wagon should be black (a classic black square, so to speak). So you can paint it either black or any other color to give even more realistic.
The Gelandewagen is one of those rare vehicles that has managed to keep its design almost unchanged since the moment it was first introduced.
The sharp edges, flat surfaces, and upright proportions have remained consistent for decades, which makes it a true design outlier.
For comparison, models like the Mercedes-Benz S-Class Coupe have gone through multiple radical changes in form and styling over the years, reflecting how most cars continually adapt to new trends.
By the way, don’t forget to visit our Mercedes-Benz S-Class Coupe drawing tutorial to learn completely different design language.
At the same time, the G-Class has undergone a remarkable transformation in its cultural meaning. What started as a utilitarian off-road vehicle has turned into a symbol of wealth and luxury.
This car is impossible to miss on city streets as much as on rugged terrain. Its presence alone communicates exclusivity, and this shift is one of the most fascinating aspects of its history.
For those who enjoy drawing square, angular cars, the G-Class is just the beginning. Be sure to check out our DeLorean drawing tutorial, where you’ll find another design built on sharp geometry and straight lines.
And don’t forget to practice the fundamentals in our main car drawing tutorial, which will help you develop the base skills needed for any vehicle.
Finally, visit our SUV drawing category to explore more lessons on off-road vehicles and boxy designs.


Great drawing tutorial!
Thank you su much
it is easy to draw thank you
Thanks, Mona! Glad this car drawing tutorial felt easy to follow.
Thanks drawcarz its very difficult to draw this car but you but the team of drawcarz made it easy
Appreciate it, Lakshya. The simple step by step system makes the drawing process much easier.
Too hard
Thanks for trying, John. Some tutorials are more advanced, but regular sketching practice makes a big difference.
hello
Hi Jay!
did u do in pc?
Yes, this tutorial was made digitally, but you can easily draw it on paper using the same steps.
can you do this for rezvani 6*6 too pls?
It is quite possible that we will make this drawing lesson.
Its to hard
Thanks for your comment! If it feels too hard, try our For Beginners category. Also, don’t forget to practice often.
i am 10 years old i love this car tysm !!! its my dream car to
keep it up
That’s great, Eashan! Keep practicing, and soon you’ll be drawing your dream cars with even more detail.
best one on this web
Thanks, Hayden! Glad you enjoyed this tutorial the most.
More simple steps please but good drawing
Appreciate the feedback. I’ll try adding more simplified step by step versions in future lessons.
thank you so much
You’re very welcome! Happy the tutorial helped you with your drawing.
Hello can you teach me how to draw a double exhaust pipe for my drawing please
In one of our next drawing tutorials we will show how to draw exhaust pipes, a double version too.
This is a life hack, Thank YOU SO MUCH
Thank you too!