How to Draw an Ambulance Car
In this tutorial, we will show you how to draw an ambulance car – a car designed specifically to transport people in need of medical care.
In different countries, these cars look different and have different equipment. In this article, we will show you how to sketch an American ambulance.
But despite the differences, all such vehicles around the world have common features, so you can illustrate an ambulance of any country by changing some parts, which we will tell you about at the end of this tutorial.

How to draw an ambulance car: step-by-step tutorial
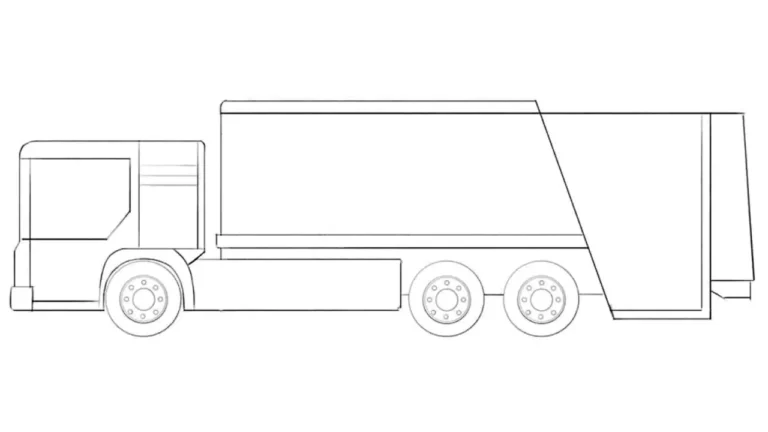
Step 1 – Indicate the base geometry of the ambulance truck
Begin with the overall silhouette of the ambulance car, separating the cab in front from the large medical box section behind. Keep the lines light and straight, as most emergency vehicles have a blocky structure. You can make the rear cabin taller or lower and narrower.

Step 2 – Sketch the cab entry and side window
Draw the ambulance truck visible side of the windshield and then the cab door. Add the rectangular window inside the door frame. These shapes define the driver’s area of the medical van. Some European ambulances use more rounded windows, while American paramedic trucks often keep them straight and angular.

Step 3 – Draw the ambulance truck’s arches and bumper
Depict the wheel arches as semicircles. Then sketch the front bumper and add a headlight above it along with a small turn signal rectangle. These details represent the emergency vehicle’s front design. To make it look older, you can draw the bumper bulkier and the lights rounder.

Step 4 – Draw the back doors of the ambulance car
Add the rectangular rear doors on the side of the medical box. These doors give access to the patient cabin. Keep them large and simple. On European-style ambulances, you might depict sliding doors instead of hinged ones for variation.

Step 5 – Draw the beltline stripes and roof lights
Sketch two long horizontal stripes running across the body, typical for emergency markings. At the top, draw small rectangular side lights. Above the cab, add the visible part of the flashing roof lights. These are essential elements that identify the vehicle as a rescue truck. If you want to show a different country’s ambulance, change the stripe patterns or light bar style.

Step 6 – Add the mirror and fuel hatch
Draw a large rearview mirror on the cab door. Add door handles as small rectangles and sketch the fuel hatch on the side. Beneath the doors, draw a step for easier entry. Additionally, you can sketch more details, to make your ambulance truck look more unique.

Step 7- Indicate the tires and rims inside the arches
Clean up unnecessary construction lines. Draw two large circular wheels in the arches, then add rims inside. Make sure both wheels are the same size and aligned evenly. For a more rugged paramedic transport, you can use thicker tires, while city ambulances usually have slimmer ones.

Step 8 – Draw the ambulance car rim geometry
In the center of each rim, draw a small hub circle. Surround it with eight smaller circles to indicate bolts or simple stamp rim holes. These concentric details make the wheels look more realistic. To make them even more realistic or detailed, you can create a different rim shape.

Step 9 – Correct the ambulance truck’s alignment issues
Review the whole emergency vehicle drawing and fix any misaligned lines. Strengthen the main contours to finish. At this point, you can also add medical crosses, lettering, or national ambulance symbols to make the rescue truck look authentic. Optionally, shade the underside and add light reflections on the glass for realism.

Next steps in drawing service vehicles
In the steps of this tutorial, we showed several variations of how an ambulance truck can be drawn.
If you’ve completed the process and achieved a good result, now is the perfect time to practice further for an even better outcome.
For example, try giving the rescue truck features typical of vehicles used in another country. To do this, simply look up the right references online and apply the same steps presented in this tutorial.
You can also experiment with adding extra details or placing the truck in an environment to make the drawing feel more contextual and complete.
Always remember that an ambulance is one of the most important vehicles for the infrastructure of any city or town, along with the police.
To continue developing your skills in this area, visit our police car drawing tutorial, where we show the entire process using the Ford Crown Victoria in a style that is simple yet realistic.
Another equally important service vehicle is the fire truck, and on our site you will also find a fire truck drawing lesson, where we explain all the key principles and details for illustrating this essential vehicle.
If you enjoyed this ambulance truck tutorial, subscribe to our free email updates so you’ll always get new lessons on service vehicles and other cars delivered straight to your inbox.
Share this guide with friends, classmates, or colleagues who may also want to practice, and keep building your skills by trying out more step-by-step tutorials from our site.


DRAWNCARS CASEYNAPTON TRUUCK
Thanks for your comment!